Shibuya Sky at sunset was the single hardest reservation I made for our Japan trip. Harder than Park Hyatt Kyoto. Harder than four JAL business class seats on the same flight. Harder than the Sagano Romantic Train.
I covered the high-level strategy in my Japan booking guide. This is the deep dive I promised — the screenshot-level walkthrough, plus what to actually do once you’re on the deck.
Verdict up front: yes, do it. But know what you’re walking into.
Before booking day: the prep that actually wins you the ticket
1) Pick your time slot before you do anything else
Sunset is what people are competing for, and Shibuya Sky’s sunset slot is the “after 3 PM” ticket on the booking site (more expensive than before-3 PM for exactly that reason). Within the after-3 PM window, you’re picking a specific entry time.
Aim for roughly two hours before sunset. I booked 1.5 hours ahead and underestimated how long the photo lines run. With two hours, you can do both decks, get the shots, and still be parked at the rail when the sun goes down.
Look up the sunset time for your specific date before release day. Don’t guess.
2) Mark your calendar — and do the time zone math now
Tickets drop two weeks in advance at midnight JST. Japan does not observe daylight saving time, so your conversion changes depending on when you’re booking from. From the US in spring, midnight JST is roughly 8 AM PST / 11 AM EST the day before. Write it down. Don’t eyeball it on the day.
3) Skip Klook and the third-party sites for sunset
Klook and other resellers are easier to navigate, but they get inventory after the official site, and by then the sunset slots are gone. If you want sunset, you book directly:
https://www.shibuya-scramble-square.com/sky/ticket/
4) Make your account now, not on release day
Create your Webket account ahead of time (Webket is the actual ticketing platform behind the official site). Log in before the release window opens. Being already logged in saves you a step that, on release day, costs you the ticket.
5) Do a full practice run a day or two ahead
This is the most important thing on this list. Walk through the entire booking flow including checkout — buy a real ticket and cancel it. You’ll learn three things you can’t learn any other way:
- Which buttons to click without reading Japanese (the English page reverts mid-purchase, and the translation often freezes).
- That step #6 below has a hidden gotcha that locks you out of checkout.
- Which credit card actually works.
On the credit card: Amex and Chase both failed me. My Atmos Mastercard worked (and earns 3x on foreign spend). Yours will be different — figure out which of yours works before the real release. Tickets are held in your cart for a few minutes, so you can try a few cards on the practice run. Don’t run that experiment when the clock’s ticking.
Booking-day walkthrough
The site reverts to Japanese at unpredictable points. Here’s what each page looks like in Japanese so you can navigate by feel.
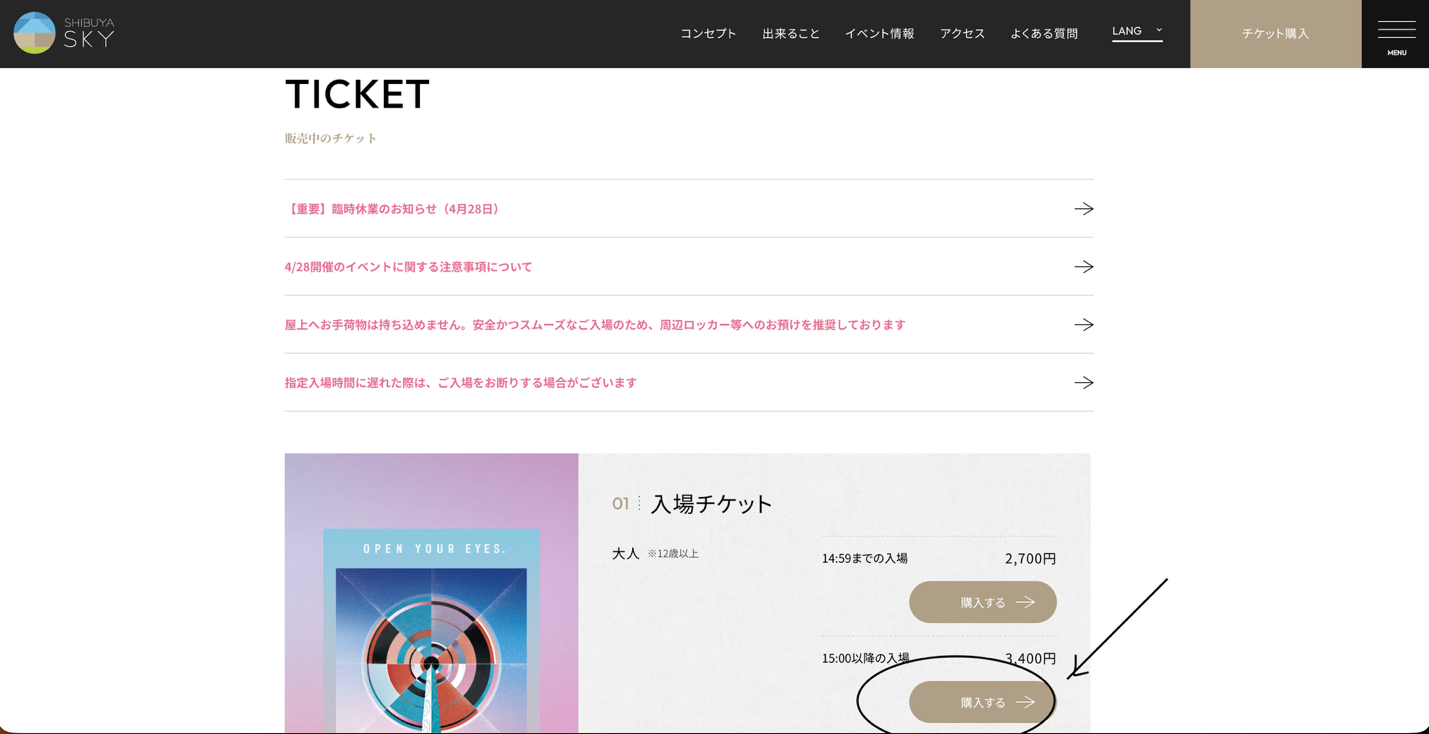
Step 1 — Choose “After 3 PM”
This is the sunset-eligible time band. It’s more expensive than before-3 PM, which is how you’ll know you’ve picked the right one if the page is in Japanese.
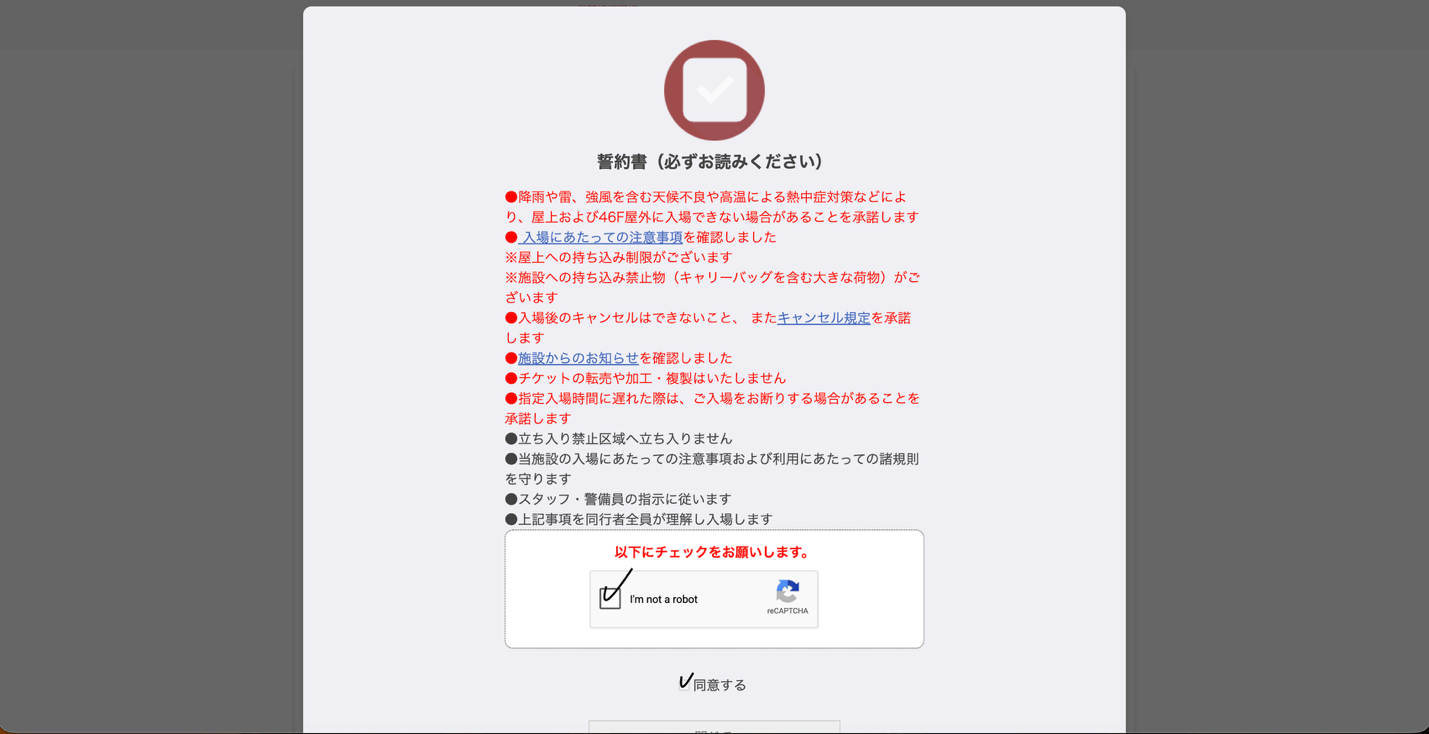
Step 2 — Accept the terms
You can’t read them, but they’re rules about what you can bring up to the deck. (Spoiler: phone and camera only. Everything else goes in lockers up top.)
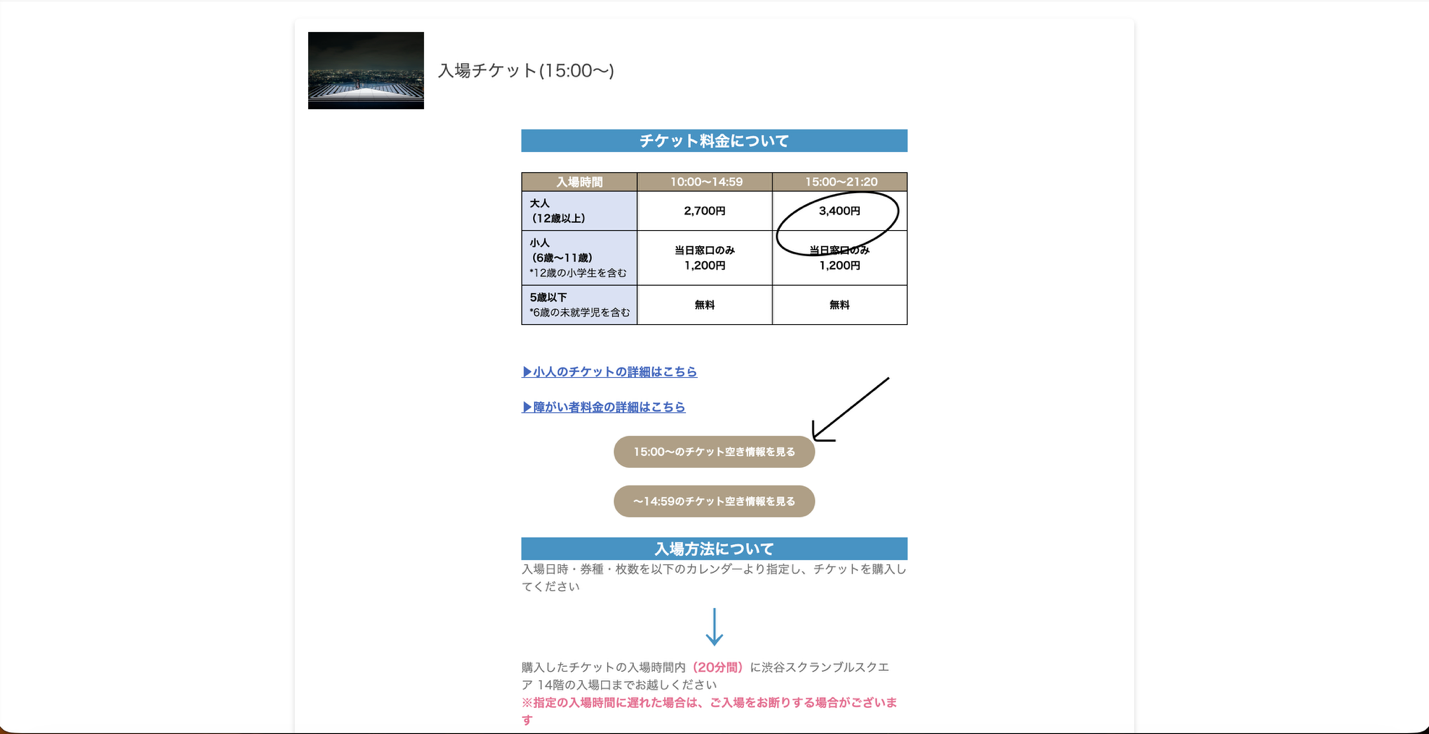
Step 3 — Confirm “After 3 PM” again
Same choice as step 1, second confirmation. The more expensive option is the right one.
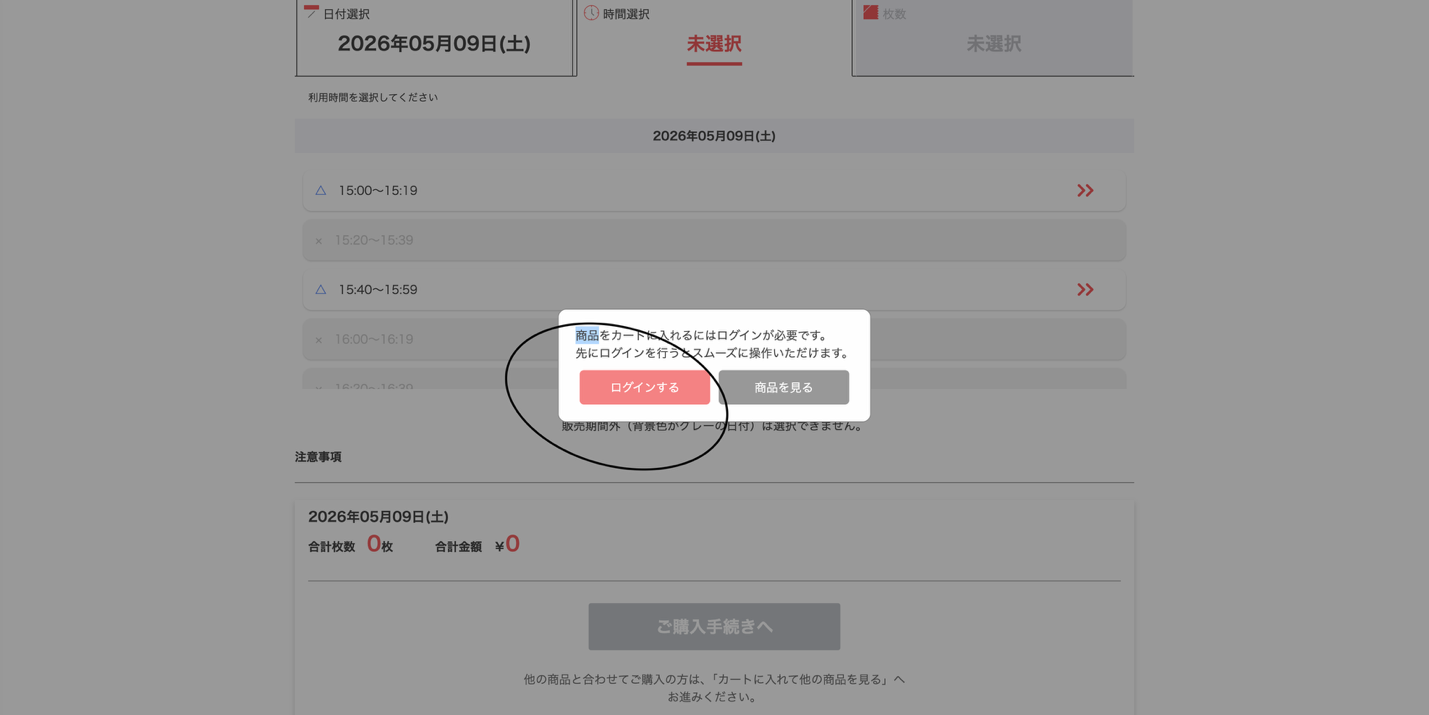
Step 4 — Pick your date, log in, choose your time slot
Pick your date. The red button on the left is the login button (skip if you logged in ahead of time, which you should have). Then pick your specific entry time within the after-3 PM window.

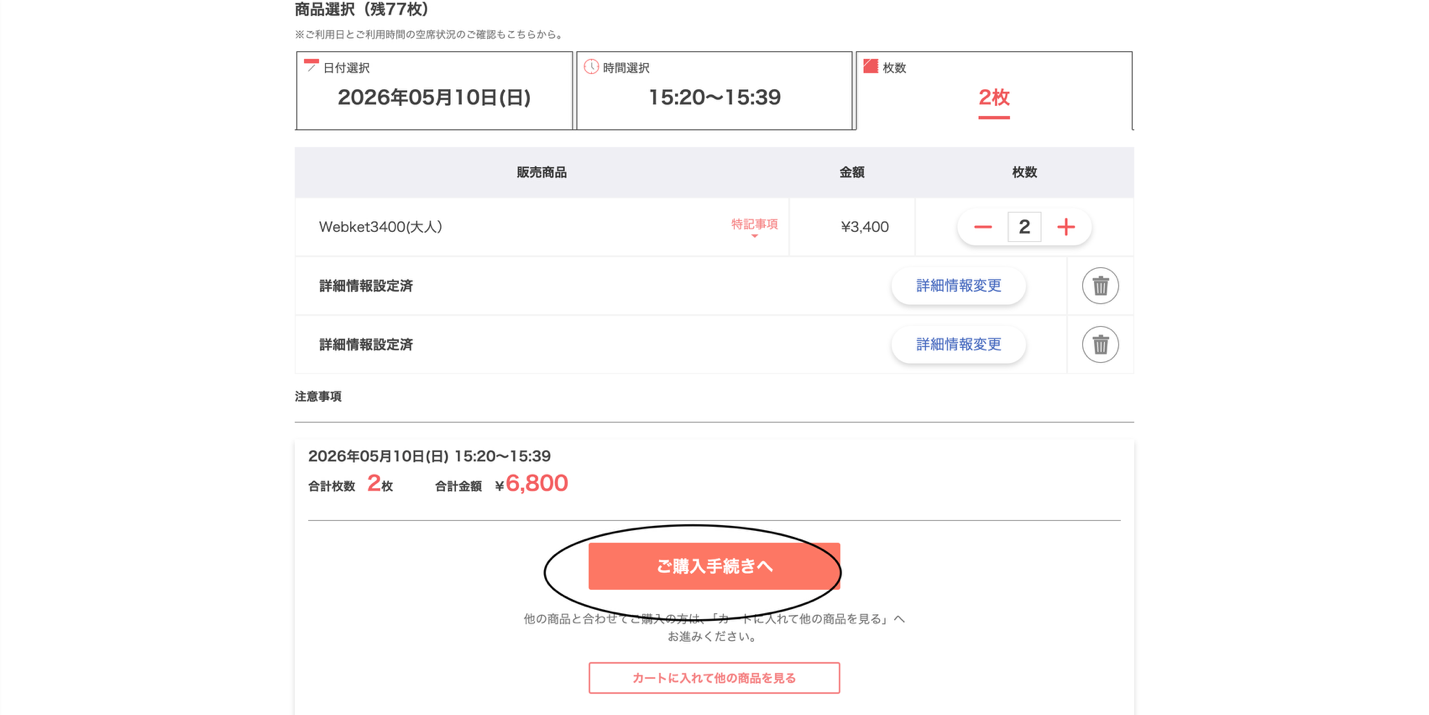
Step 5 — Add adults only
You cannot purchase kids’ tickets here. For kids under 12, you’ll buy at the ticket counter day-of (they sell kids’ tickets as long as you have at least one adult ticket — no need to overpay for adult tickets just to cover them).
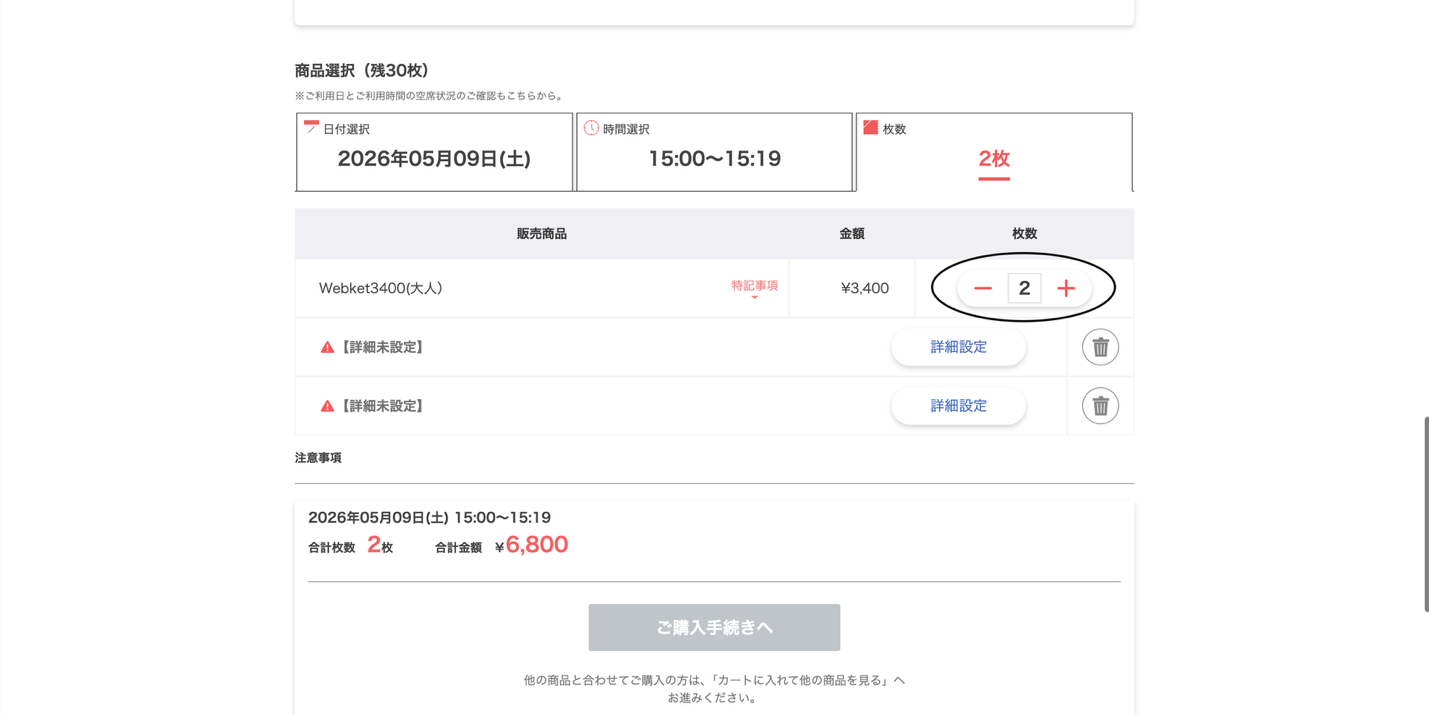
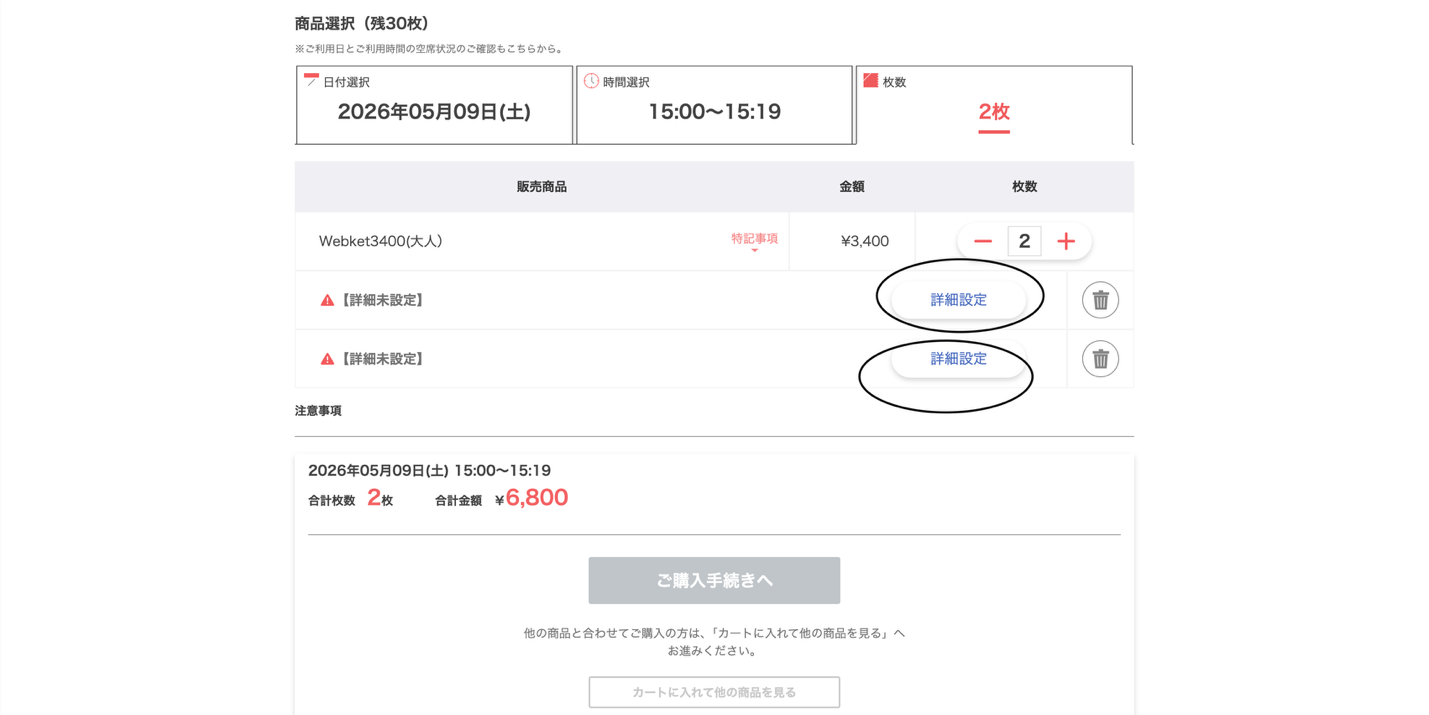
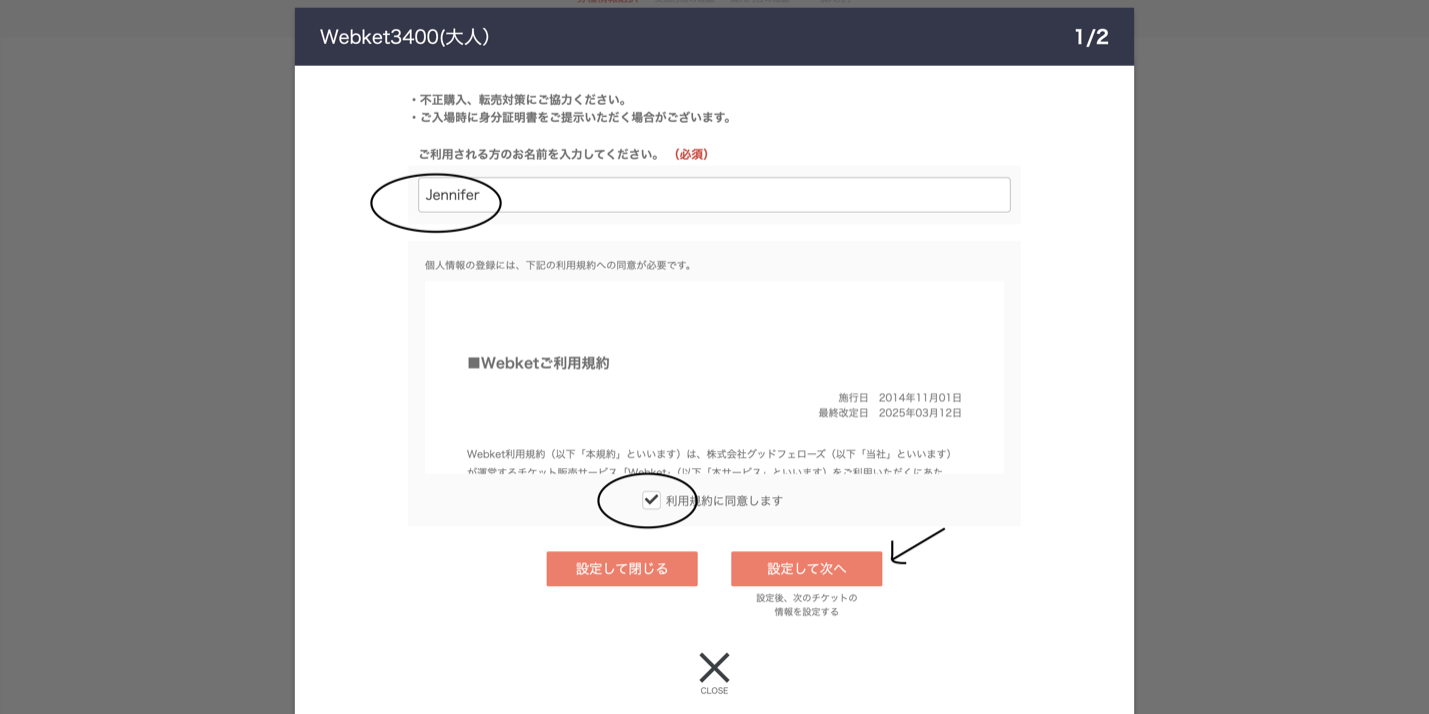
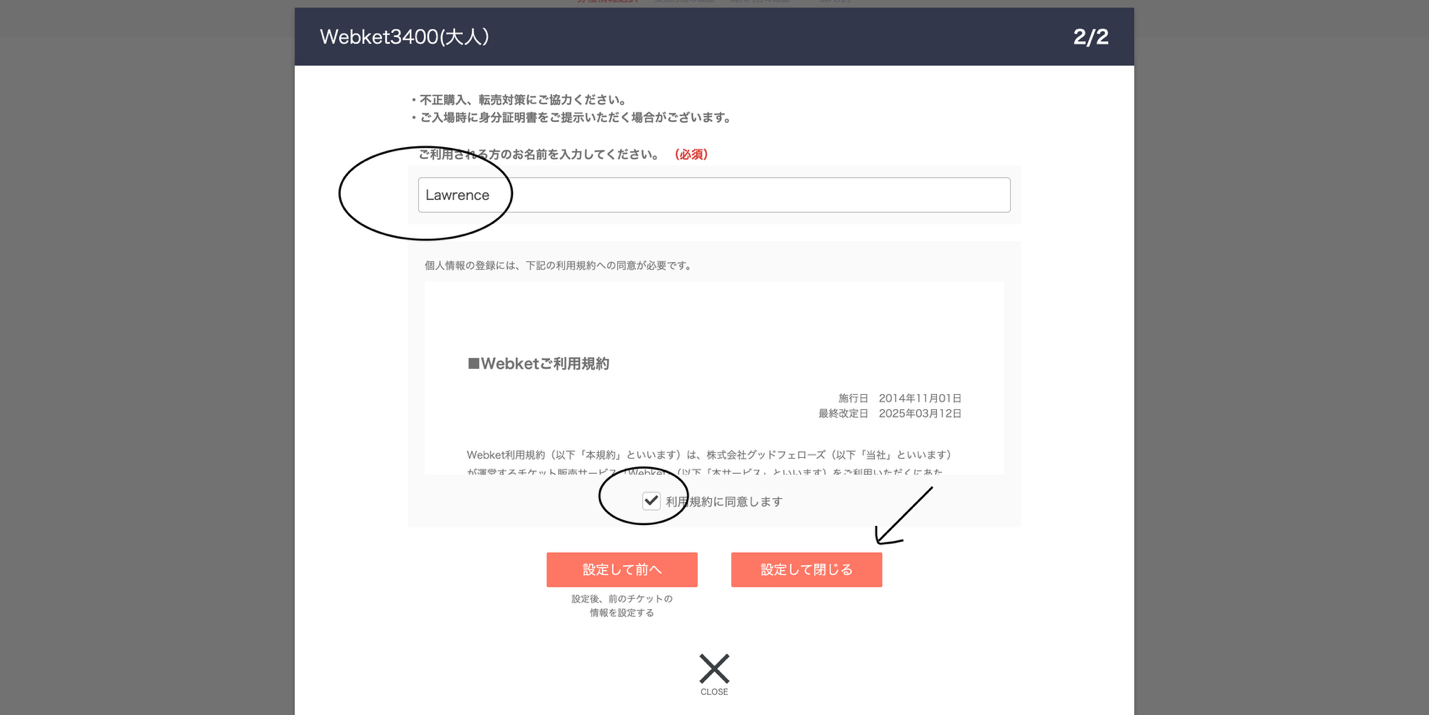
Step 6 — Click “Detail” and type each adult’s name
This is the hidden gotcha that breaks people. There’s no popup telling you to do this. If you skip it, the checkout button stays locked and you can’t figure out why. Click “Detail,” type each adult’s full legal name (they check ID at the deck — don’t use a nickname).
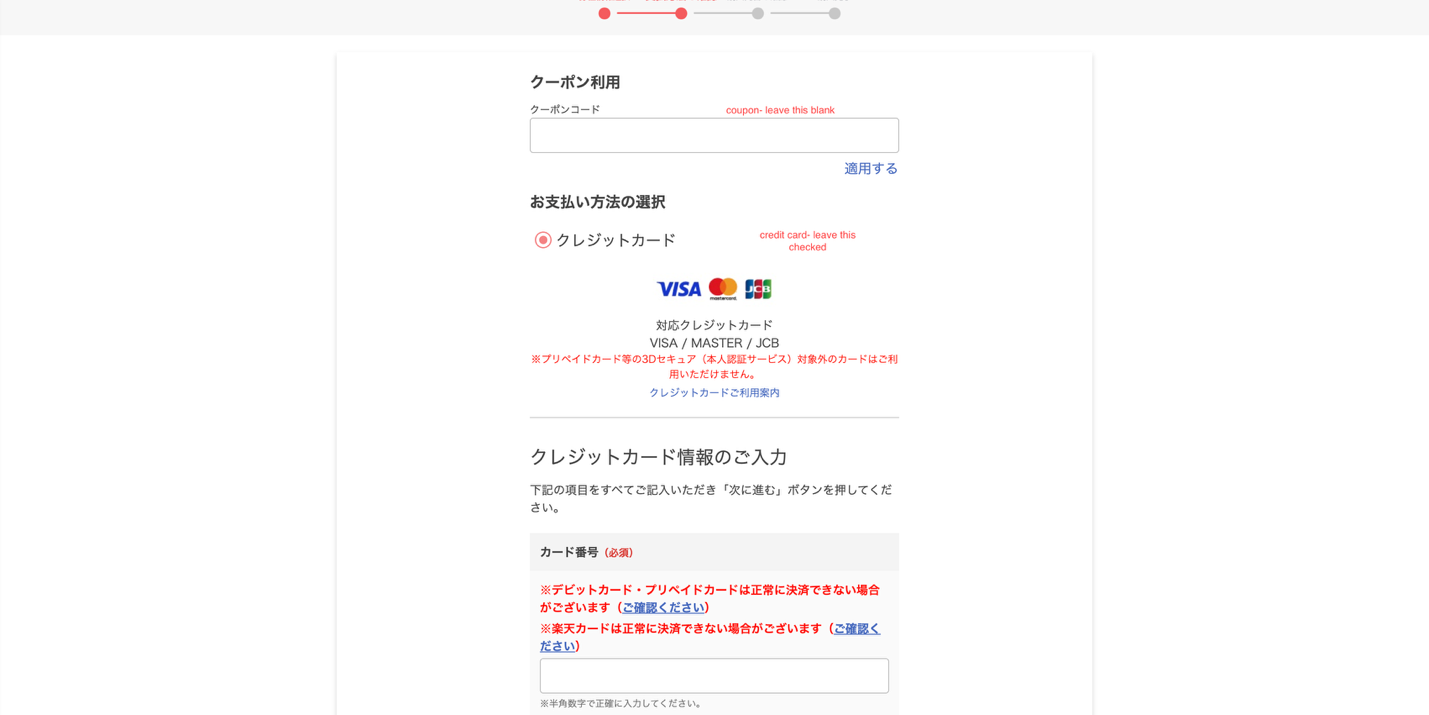
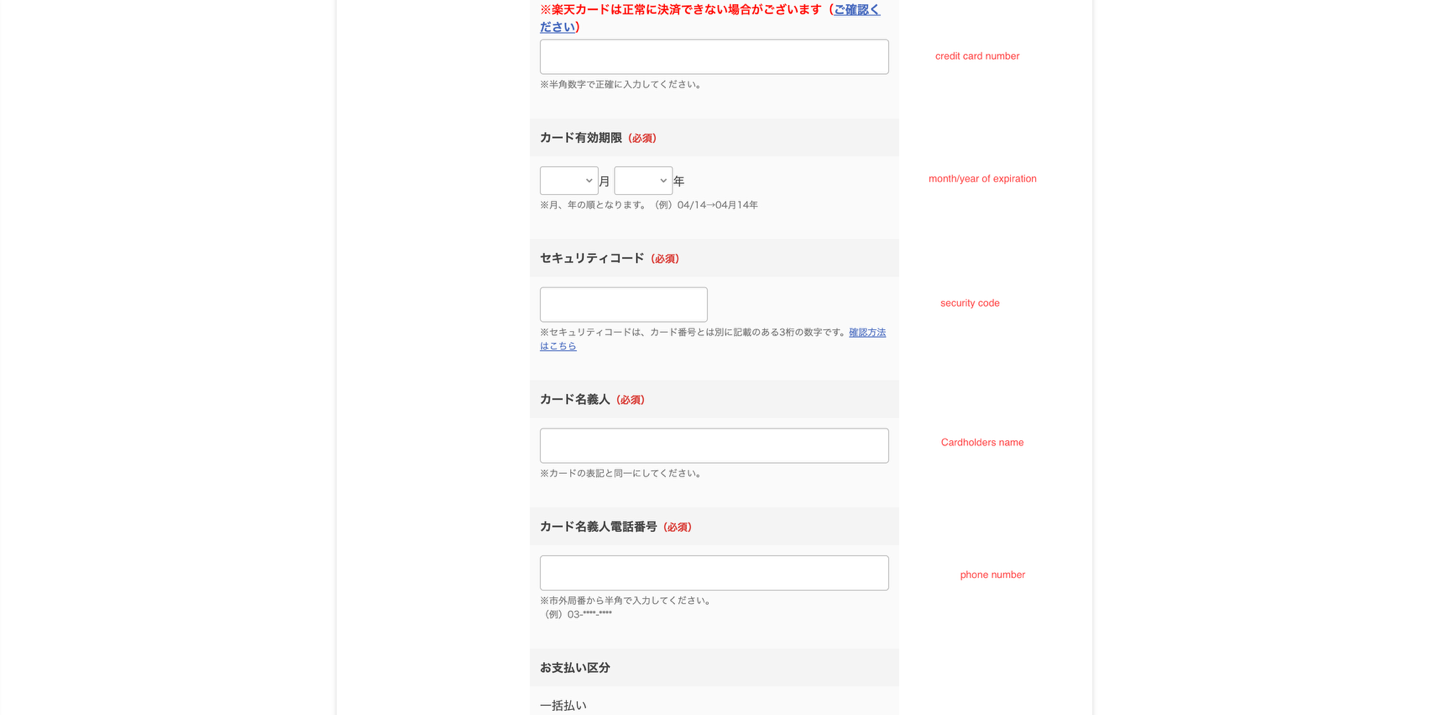
Step 7 — Pay (in Japanese)
If the page has reverted to Japanese, here’s what each field is asking for:
One more tip: refresh Webket directly
On release day, the fastest way to see tickets is to be already logged into Webket and refresh that page. If you go through the main shibuya-scramble-square.com URL, tickets won’t appear for 6–8 minutes after release — and by then the sunset spots are gone.
What to expect once you actually have a ticket
You did it. Now: how to not waste the win.
Getting there
Shibuya Sky is at the base of the Shibuya Scramble Square shopping center, across the famous crossing from the train station. There are signs in front of the elevators. Staff check ticket times before letting you up.
Show up 30 minutes before your entry slot. Your 5–5:30 PM ticket means be there by 4:30. Going up takes time: an elevator to the check-in floor, the kids’ ticket counter (if you need it), then a second elevator to the top.
What to bring up
Lockers at the top are free. Anything loose goes in a locker.
Keep with you:
- Phone or camera (the only two things you’re allowed at the rail).
- Your jacket. It is cold up there.
- A brush. The wind is brutal.
Photo strategy: top deck first, then drop down
When you exit onto the first deck, you’re right at the famous Instagram corner. The line for that spot is slow — every group takes 20+ permutations and there’s no time limit.
Don’t start there.
Go straight up to the top deck. Stairs or elevator, doesn’t matter. Up top there’s a second photo spot with a staff photographer who runs a 30-second timer per group. The photo isn’t necessarily better than your own — the value is the timer. Make friends with the people behind you in line; they’ll take the shot on your phone if you don’t want to pay for the pro version. Know what shots you want before you reach the front. You have 30 seconds.
After the top, drop down for the unregulated Instagram corner. Do it in this order. If you do it backwards, you’ll spend an hour in the slow line and miss sunset at the top.
After the photos
If sunset hasn’t happened yet, go back up to sit and stare. If you’re freezing, this is when to head inside for a snack or to hit the souvenir shop. If you bought the pro photo, they’ll have it ready in 20–30 minutes, sold to you right before the descending elevators.
The line for the down elevators after sunset is long. If you have dinner reservations, build that into your timing.
Was it worth it?
The honest answer: yes.
There are other Tokyo views people will tell you are equivalent. The Tokyo Metropolitan Building observation deck is free but only open weekdays. Tokyo Skytree is taller but has no outdoor deck. Park Hyatt Tokyo has floor-to-ceiling views from its upper floors and restaurants if you’re staying there.
None of those are Shibuya Sky at sunset. There’s something specifically magical about being outside, no glass between you and the city, watching the sun drop behind a skyline you instantly recognize, surrounded by people who are equally excited to be there. The hype is part of why it’s good.
If you don’t get the ticket: it’s not the end of the world. Tokyo at sunset is beautiful from a lot of places.
But if you can get the ticket — get the ticket.
If the booking gauntlet is feeling like a lot, reach out. That’s what I’m here for.